
You’ve got that nice patio or walkway, the one with all the pavers. Looks great, right? But then, bam! Weeds start popping up between the cracks and start causing interlock sand problems. It’s especially frustrating for Ottawa homeowners, where harsh freeze-thaw cycles make the problem worse every spring. You thought you picked the right stuff, like polymeric sand, to keep things looking sharp and weed-free. So, why are those pesky plants still showing up? Let’s figure out what’s going on and how to actually stop them for good.
The Real Reason Weeds Keep Growing Between Your Pavers
You’ve got that beautiful interlock patio or walkway, and for a while, it looks fantastic. Then, almost overnight, it seems like a tiny jungle is taking over the cracks. It’s frustrating, right? You might have even used that special polymeric sand, thinking it was supposed to be a weed-proof solution. So, why do these stubborn little plants keep popping back up between your pavers, year after year?
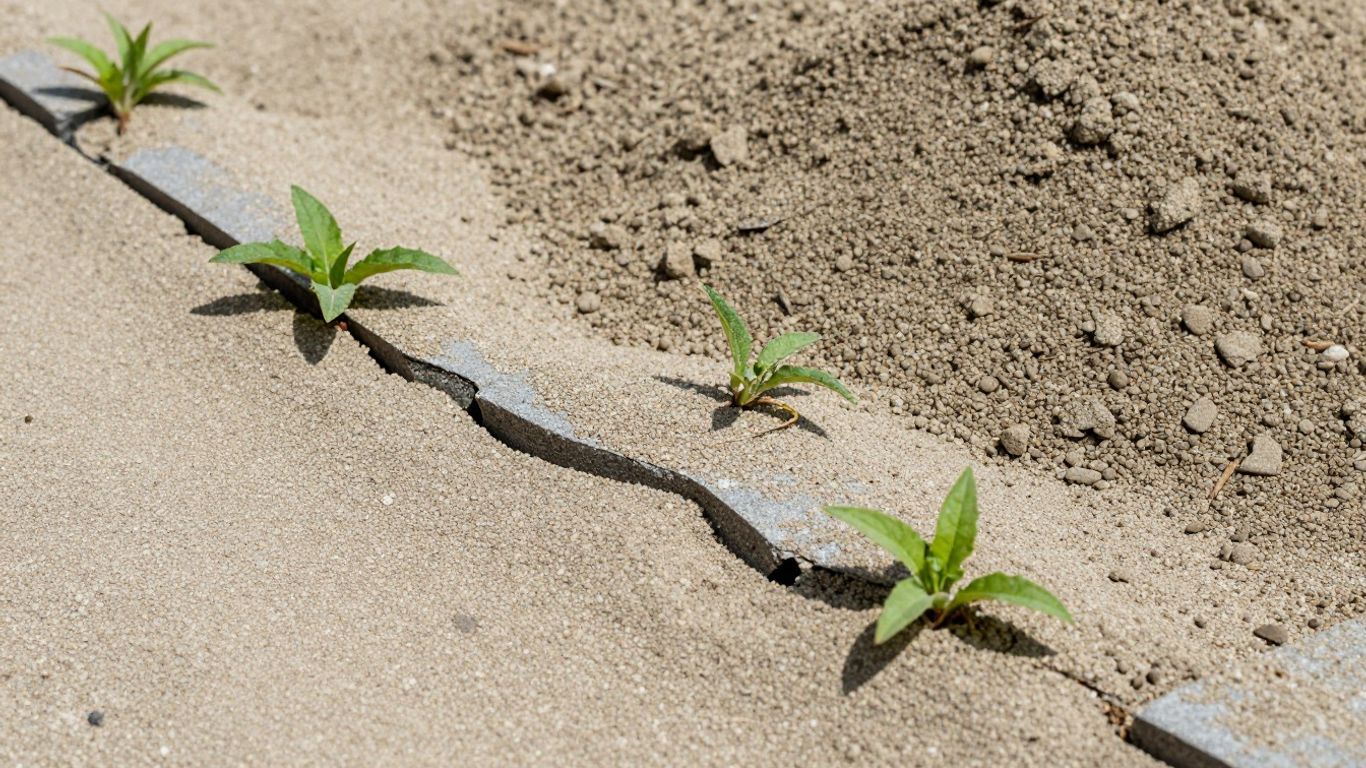
It’s a common problem across Canada, and honestly, it’s not usually because the pavers themselves are the issue. Our harsh winters and spring thaws put extra stress on joint sand, accelerating the erosion that lets weeds take hold. The real culprits are often a combination of factors related to the joint material and what settles into those spaces. Weeds don’t typically grow from underneath; they’re usually seeded from above. Think of those tiny seeds blowing in on the wind, landing in the joints where they find a bit of dirt, moisture, and sunlight. It’s the perfect recipe for a weed to take root.
Tired of Pulling the Same Weeds Every Summer?
The problem is almost always the joint sand — and it’s completely fixable. KJ Landscape & Design offers free estimates for homeowners dealing with interlock weed problems or issues with landscaping in Ottawa. Call us: +1 (613)-229-0213 or request your free estimate.
Here’s a quick look at why this keeps happening:
- Airborne Seeds: Wind carries weed seeds everywhere. Your interlock joints are just convenient landing spots.
- Organic Debris: Leaves, dirt, and other bits can accumulate in the joints over time, creating a mini-soil bed for seeds.
- Joint Sand Problems: If the sand isn’t properly installed, compacted, or if it’s old and has washed out, it leaves gaps where weeds can easily establish themselves.
It’s easy to feel like you’re in a losing battle with interlock weeds. You pull them, they come back. You might even try a quick fix, only to see them return even stronger. Understanding why they persist is the first step to actually keeping them away for good.
This cycle of pulling and reappearing can be incredibly annoying. It makes your lovely outdoor living space in Ottawa look unkempt and can even start to damage the pavers themselves if left unchecked. Let’s figure out what’s really going on and how to finally get ahead of these persistent invaders.
What Is Interlock Joint Sand and Why It Matters
So, you’ve got those nice interlocking pavers, right? Whether it’s your driveway pavers Ottawa, patio, or walkway, they look pretty sharp. But what’s actually holding them together and keeping those pesky weeds out? A big part of that is the sand in the joints between the pavers. This isn’t just any old sand; it’s specifically chosen for its role in the whole system.
The Role of Interlock Sand in Paver Stability
The sand tucked into the gaps between your pavers does more than just fill space. It’s the key ingredient that locks everything together, giving your paved surface its strength and stability. Think of it like the mortar between bricks, but for pavers. When the sand is in place and properly settled, it prevents the pavers from shifting, rocking, or moving around. This is super important, especially with changes in temperature and moisture, which can cause materials to expand and contract. Without good joint sand, your pavers can start to loosen up over time, leading to uneven surfaces and, you guessed it, more room for weeds to grow.
Types of Interlock Joint Sand (Regular vs Polymeric)
When we talk about interlock joint sand, there are generally two main types you’ll come across:
- Regular Joint Sand: This is your basic, run-of-the-mill sand. It’s usually a finer grain sand, sometimes called mason sand. While it fills the gaps and provides some initial stability, it doesn’t really harden or bind. Over time, it can get washed out by rain or blown away by the wind, leaving those joints open and inviting for weed seeds. It’s the budget option, but often means more maintenance down the road.
- Polymeric Joint Sand: This is where things get interesting. Polymeric sand is a mix of fine sand and special additives, like polymers. When you add water to it after installation, these additives activate and harden, creating a solid, flexible bond between the pavers. This makes the joints much more resistant to erosion from water and wind. It’s also a much better deterrent against weeds and insects trying to make a home in your paver joints. While it costs more upfront, many people find it’s worth the investment for the long-term benefits and reduced hassle. It’s often considered the industry standard solution for a reason.
Choosing the right kind of interlock sand and making sure it’s installed correctly is a big deal for the longevity and appearance of your paved areas. It’s the first line of defence against those annoying weeds and keeps your investment looking its best.
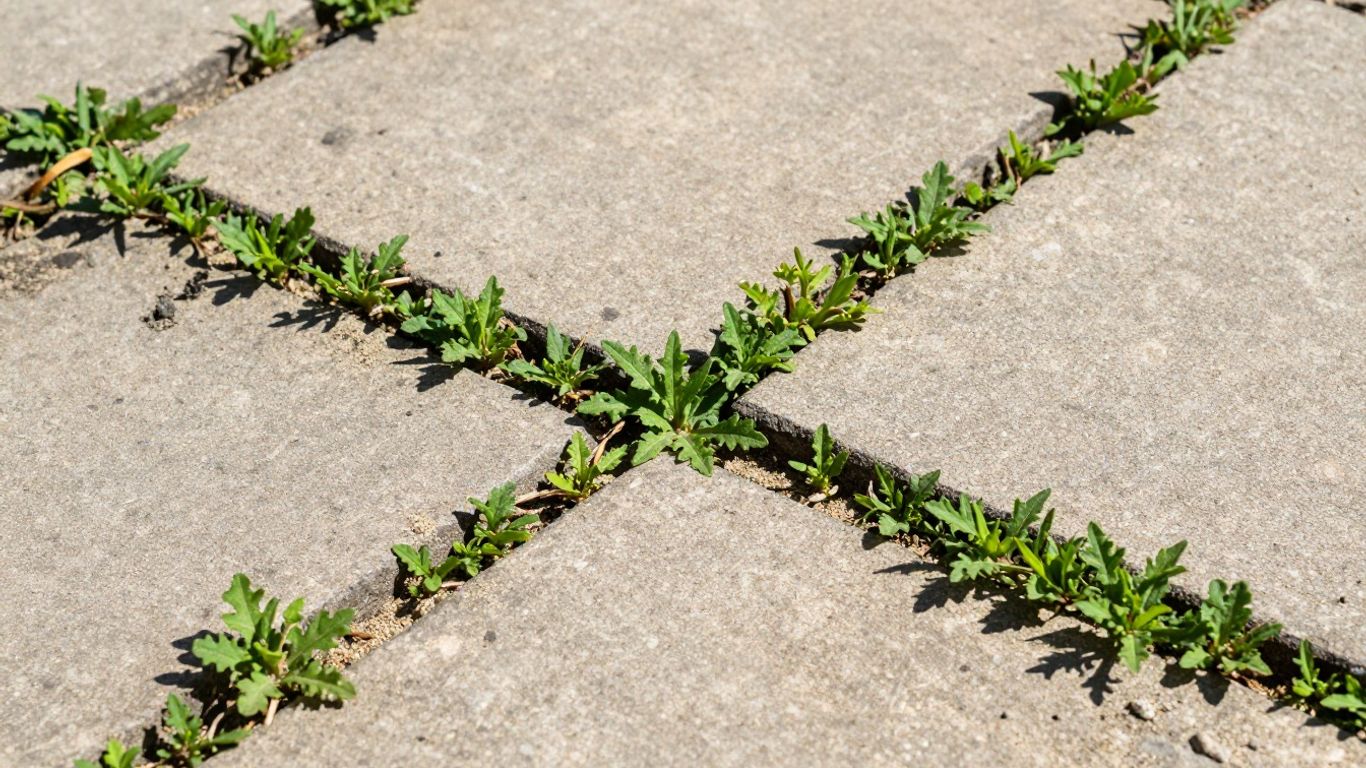
Why Weeds Keep Coming Back Between Interlock Pavers in Ottawa
It’s a tale as old as time for homeowners with interlock patios and walkways: you spend time and money getting them looking sharp, only to see those pesky weeds popping up between the stones again. You might think they’re growing up from the earth below, but that’s usually not the case. Instead, weed seeds are like tiny, determined travellers, carried by the wind and landing right in the joints of your pavers. Give them a little dirt, some sun, and a splash of water, and voilà – a new weed is born, ready to spread.
Dirt and Organic Debris Build-Up
In Ottawa specifically, spring snowmelt and heavy April rains flush organic debris deep into joints, creating ideal conditions for weed germination. Over time, leaves, soil, and other organic bits get blown or washed into the gaps between your stones. This debris acts like a perfect little nursery for weed seeds. It provides the nutrients and moisture they need to germinate and take root. The more organic material that accumulates, the more inviting the space becomes for weeds. It’s a cycle that’s hard to break if you’re not actively managing it.
Washed-Out or Missing Joint Sand
The sand in the joints isn’t just filler; it’s a key part of what keeps your pavers stable and locked together. When this sand gets washed out by heavy rain, or if it was never properly installed in the first place, gaps start to appear. These gaps are like open invitations for weed seeds to settle in and start growing. Without that protective layer of sand, the pavers can also shift, creating even wider openings for weeds and making the whole surface less stable. Keeping those joints filled is really important for paver stability.
Think of the joint sand as the mortar holding your bricks together. If the mortar crumbles or disappears, the bricks become loose and vulnerable. The same principle applies to your interlock pavers. The sand locks them in place and prevents unwanted growth.
Common Interlock Sand Problems Homeowners Face
So, you’ve got that beautiful interlock patio or driveway, and you thought you were done, right? Well, sometimes, even with the best intentions, things start to go a bit sideways. It’s super frustrating when those pesky weeds keep popping up, or you notice gaps where the sand used to be. Let’s talk about what’s actually going on with that joint sand and why it’s causing headaches.
Sand Erosion and Joint Gaps
One of the most common issues is when the sand between your pavers starts to disappear. This isn’t just about looks, though it definitely makes things look a bit rough. When the sand erodes, it leaves gaps. These gaps are like an open invitation for trouble. Without enough sand, the pavers aren’t locked in place as tightly as they should be. This means they can start to shift, wobble, or even sink over time, especially with the city’s aggressive freeze-thaw cycles, where ground movement between November and April puts constant pressure on your paver base. Think of it like trying to build a wall without enough mortar – it’s just not going to hold up.
- Water Washout: Heavy rain or even regular sprinklers can slowly wash the sand away, especially if it wasn’t compacted properly in the first place.
- Wind and Debris: Strong winds can pick up loose sand, and sweeping or blowing debris can also contribute to its removal.
- Foot Traffic and Use: Simply walking or driving over the pavers can dislodge sand over time, particularly in high-traffic areas.
When the joint sand is compromised, the entire paver system loses its structural integrity. This makes it more susceptible to damage from weather and use, leading to a domino effect of problems.
Weed, Moss, and Ant Infestation
When those joint gaps appear, or if the sand itself isn’t doing its job, you open the door to unwanted guests. Weeds are the most obvious culprits. Their seeds are everywhere, just waiting for a little bit of soil and moisture to sprout. If there’s no solid sand to stop them, they’ll happily take root. Moss can also start to grow in damp, shaded areas where the sand has washed out. And don’t forget about ants! They love to tunnel through loose sand, creating little mounds and further destabilizing the pavers. It’s a whole ecosystem of problems that starts with a simple lack of proper joint material. Getting rid of weeds between brick pavers is a constant battle if the joints aren’t properly filled and maintained.
- Weeds: They find any tiny bit of exposed soil or organic matter to grow, breaking up the pavers and looking messy.
- Moss: Thrives in damp, shaded joints where sand has been washed away, making surfaces slippery.
- Ants: They excavate the sand, creating tunnels that weaken the paver base and can lead to sinking.
It’s a cycle: missing sand leads to weeds and pests, which further degrade the sand and the pavers. Addressing these issues promptly is key to keeping your interlock looking great and functioning properly for years to come.
Regular Sand vs Polymeric Sand: Which One Works Better?
So, you’ve got weeds popping up between your interlock pavers, and you’re wondering if the type of sand you used (or should use) makes a difference. It absolutely does. Think of regular sand as a temporary fix, while polymeric sand is more of a long-term solution. Regular sand, often called mason sand, is just that – sand. It fills the gaps and helps the pavers sit snugly, but it doesn’t really harden or bind together. This means it can easily get washed out by rain or blown away by the wind, leaving those inviting little gaps for weed seeds to settle into.
Polymeric sand, on the other hand, is a mix of fine sand and special polymers. When you add water, these polymers activate and harden, creating a solid, flexible joint between your pavers. This makes it much harder for weeds to take root and also helps prevent insects from burrowing.
Here’s a quick rundown:
- Regular Sand:
- Fills gaps, provides some stability.
- Easily washed or blown away.
- Weeds can grow readily in it.
- Needs frequent topping up.
- Polymeric Sand:
- Hardens to create a solid joint.
- Resists erosion from water and wind.
- Significantly deters weed and insect growth.
- Requires proper installation for best results.
The key difference really comes down to how the joint material behaves over time. While regular sand might seem like a cheaper option upfront, the constant need for refilling and the persistent weed problem can make it more of a headache in the long run. Polymeric sand, when installed correctly, offers a much more robust defense against those pesky weeds. It’s a bit more involved to install, requiring careful sweeping, compaction, and proper activation with water, but the payoff is usually worth it for a cleaner, more stable patio. If you’re looking for a lasting solution, especially after dealing with spring landscaping issues, polymeric sand is generally the way to go.
How to Fix Interlock Joint Sand Problems Properly
Okay, so you’ve got weeds popping up everywhere between your interlock pavers, and the sand is looking a bit sad. It happens to the best of us! Don’t worry, fixing it isn’t rocket science, but it does take a bit of elbow grease and the right approach. The key is to get rid of the old, weed-friendly stuff and replace it with something that actually holds firm.
Removing Old or Contaminated Sand
First things first, you need a clean slate. If your joint sand is full of dirt, old organic gunk, or just looks like it’s crumbling away, it’s time to go. Trying to add new sand on top of this mess is like putting a band-aid on a broken bone – it just won’t work long-term.
Here’s how to tackle it:
- Sweep and Scrape: Start by sweeping out as much loose debris and sand as you can. For stubborn bits, a stiff brush or even a putty knife can help dislodge them.
- Power Wash (Carefully!): This is where a pressure washer comes in handy. Use a moderate setting – you don’t want to blast away the edges of your pavers! Aim to wash out the old sand and any weed roots lurking in the joints. You might need to go over it a couple of times.
- Let it Dry: This is super important. Give the joints a good day or two to dry out completely, especially if you used a lot of water during the washing. You don’t want to trap moisture.
If you’re dealing with a lot of moss or algae, a mixture of white vinegar and water can help kill it off during the cleaning process. Just be sure to rinse thoroughly afterwards.
Refilling and Compacting New Joint Sand
Now for the good part – adding the new sand! For most situations, especially if you want to keep those weeds at bay, polymeric sand is your best bet. It hardens up and creates a solid barrier.
- Choose the Right Sand: Grab some good quality sand. Avoid the cheapest stuff if you can; a slightly better product often lasts longer.
- Pour and Spread: Pour the sand into the joints, working it in with a broom. You want to fill the joints completely, but don’t overdo it – you don’t want a thick layer on top of the pavers.
- Compact: This is a step many people skip, but it’s vital. Use a plate compactor (you can often rent these) to vibrate the sand down into the joints. This settles it firmly. If you don’t have a compactor, you can use a rubber mallet on a piece of wood placed over the pavers, but it’s not quite as effective.
- Sweep Again: Sweep off any excess sand from the paver surfaces. You want the sand in the joints, not sitting on top.
Sealing for Long-Term Protection
Once you’ve got fresh, compacted sand in there, a good sealant can add an extra layer of defence. It helps lock everything in place and can make cleaning easier down the road.
- Apply Sealant: Follow the manufacturer’s instructions for your chosen paver sealant. Usually, this involves spraying it on evenly and letting it cure.
- Wait for Dry Weather: Make sure you have a few dry days ahead after sealing, as most sealants need time to cure properly without being rained on.
Doing this properly might seem like a bit of a project, but trust me, it makes a huge difference in keeping those pesky weeds from returning. It’s all about getting that joint solid and stable.
How to Prevent Weeds from Coming Back for Good
So, you’ve dealt with the weeds, maybe even redone the sand. Now, how do you keep those pesky things from returning? It really comes down to a few key things, and honestly, it’s mostly about staying on top of it.
First off, regular sweeping is your friend. Think of it like tidying up your living room – a quick sweep a few times a week can make a huge difference. This gets rid of any stray seeds or little bits of organic stuff that land in the joints before they have a chance to sprout. It sounds simple, but it really works.
Next, keep an eye on your polymeric sand. Over time, especially in areas where people walk a lot or after a harsh winter, some sand can get kicked out or washed away. If you start seeing small gaps forming between your pavers, it’s time to top them up. Don’t wait until you see weeds; by then, it’s already a bit late.
Here are some other things to consider:
- Water Management: Make sure your patio or walkway slopes away from your house. You don’t want water pooling up anywhere, as that creates a nice little spa for weed seeds.
- Weed Patrol: If you spot a weed trying to make a comeback, pull it out right away. The sooner you catch it, the easier it is to deal with. A little vinegar and dish soap mix can help with stubborn ones, but be careful not to spray it on your lawn or mulch garden beds.
- Sealing: Once you’ve got fresh polymeric sand in there and it’s all cured, consider applying a paver sealer. This adds an extra layer of protection, making it harder for seeds to take root and also helps protect the sand itself from erosion.
The biggest mistake people make is thinking that once the sand is in, the job is done. It’s not a ‘set it and forget it’ kind of deal. Consistent, simple maintenance is what truly keeps those weeds at bay for the long haul. It’s about being proactive, not just reactive.
And remember, if you used regular sand instead of polymeric, you’re going to be fighting this battle a lot more often. Polymeric sand hardens and creates a much more solid barrier, which is why it’s the go-to for preventing weeds in the first place.
When to Call a Professional for Interlock Repair
Sometimes, you just can’t get ahead of the weeds, no matter how much you try. If you’ve spent weekends pulling out stubborn plants, only to see them pop back up a week later, it might be time to call in the pros. Trying to patch up failing joints with regular sand often doesn’t work long-term because new sand won’t bond with the old stuff. This leads to cracks and the new sand just popping out, leaving you back at square one.
When the problem is more than just a few weeds, it often means the joint sand has been washed out or is contaminated with dirt and organic bits. This creates gaps where seeds can easily take root and grow. If your pavers are starting to shift, tilt, or feel loose underfoot, that’s a clear sign the structural integrity is compromised. This can happen from freeze-thaw cycles or just regular use, and it’s not something a quick top-up of sand will fix.
Here are a few situations where professional help is a good idea:
- Extensive Weed Growth: If weeds are everywhere and manual removal isn’t making a dent, it suggests a deeper issue with the joint material.
- Shifting or Uneven Pavers: Loose or tilting pavers aren’t just unsightly; they can be a tripping hazard and indicate a failure in the base or joint stabilization.
- Widespread Sand Erosion: If large sections of your interlock are missing sand, leaving wide gaps, it needs a thorough cleaning and refilling.
- Moss or Algae Problems: Persistent moss or algae growth can mean the joints are holding too much moisture, which might require a more involved cleaning and sealing process.
Professionals have the right tools and materials, like high-quality polymeric sand and specialized cleaning equipment, to properly prepare the joints and create a lasting seal. They can also assess if there are underlying issues with the paver base that need addressing.
Think of it like this: Ottawa winters are not kind to interlock. What starts as a small joint gap in October can become a shifted, weed-infested surface by May. Getting a professional to assess it early saves you significantly more money than a full repair later.
Don’t Wait Until Spring Turns a Small Problem Into a Big One
The city’s freeze-thaw cycles move fast. A small joint gap in October becomes shifted pavers and a full weed infestation by May. The earlier you catch it, the cheaper and easier the fix. Call us now: +1 (613)-229-0213. or prefer to write in? Fill Out Our Free Estimate Form → We typically respond within 1 business day.
Why Ottawa Homeowners Choose KJ Landscape & Design for Interlock Repairs
Dealing with persistent weeds and shifting pavers is a common frustration for homeowners, especially after a long winter. At KJ Landscape & Design, we understand the specific demands our local climate puts on interlock systems, and we provide lasting solutions built for the city’s conditions — not just quick fixes that fail by next spring.
We know that regular sand just doesn’t cut it for long-term weed prevention. It washes out, gets contaminated, and creates the perfect little seedbeds for unwanted greenery. That’s why we focus on proper preparation and the right materials. Our process typically involves:
- Thoroughly cleaning out old, degraded sand and any accumulated debris.
- Applying high-quality polymeric sand, which hardens to create a strong, weed-resistant barrier.
- Ensuring proper compaction for maximum stability and longevity.
We believe in doing the job right the first time, saving you time and money in the long run. It’s about restoring the structural integrity of your interlock and preventing future problems before they start. We’ve seen it all, from minor joint gaps to significant paver erosion, and we have the tools and knowledge to address each issue effectively.
Choosing the right approach for your interlock maintenance is key. It’s not just about filling gaps; it’s about creating a system that resists the elements and keeps your outdoor space looking its best for years to come. We take pride in our meticulous work, aiming for results that you’ll be happy with.
We serve homeowners across Ottawa and surrounding areas, including Greely, Manotick, Winchester, Metcalfe, Russell, Kemptville, Barrhaven, Richmond, Stittsville. If you’re tired of battling weeds and want a reliable solution for your interlock pavers, give us a call or fill out our estimate form below.
Stop the Weed Cycle for Good — Ottawa Interlock Maintenance Tips
So, it turns out keeping those pesky weeds out of your interlock joints isn’t always as simple as just laying down some sand. We’ve seen how things like bad installation, poor drainage, or even just seeds blowing in can let those unwanted plants take root. The good news is, with a bit of effort upfront and some regular upkeep – like sweeping up debris and topping up the sand when needed – you can really cut down on the weed problem. It’s all about giving those weeds nowhere to go and nothing to grow in. A little attention each spring — especially after Ottawa’s thaw — can save you a lot of frustration later. And if you’re not sure where to start, a free assessment from KJ Landscape & Design gives you a clear picture with zero commitment.
Ready to Stop Fighting Weeds for Good? KJ Landscape & Design serves Ottawa homeowners with professional interlock repair and maintenance. Whether your joints need topping up or a full redo, we’ll assess your situation honestly — at no cost to you. Reach out to us via +1 (613)-229-0213 or get a free estimate
Frequently Asked Questions
Why do weeds keep growing in my interlock patio even after using special sand?
Even with special sand, weeds can still pop up. This often happens if the sand wasn’t put in properly, like not being packed down enough or not getting enough water to activate it. Also, if dirt and old leaves build up in the cracks, weed seeds can land there and start growing. Sometimes, the sand just gets washed out over time, leaving gaps for weeds.
What’s the difference between regular sand and polymeric sand for interlock joints?
Regular sand is just plain sand. It can wash away easily and doesn’t do much to stop weeds. Polymeric sand, on the other hand, has tiny plastic binders mixed in. When you add water, these binders harden and lock the sand together, creating a strong barrier that’s much better at preventing weeds and stopping the pavers from moving.
How can I get rid of weeds that are already growing between my pavers?
To get rid of weeds, you first need to pull out the big ones by hand. Then, you’ll likely need to remove the old, loose sand from the cracks. You can use a pressure washer carefully for this. Once the cracks are clean and dry, refill them with new polymeric sand, making sure to pack it down well and activate it with water according to the product’s instructions.
What’s the best way to stop weeds from coming back after I fix the joints?
Keeping your patio clean is key! Regularly sweep or blow away leaves, dirt, and grass clippings before they can settle into the cracks. If you notice any small weeds starting to sprout, pull them out right away before they get a chance to spread or go to seed. Sealing your pavers can also add an extra layer of protection.
How often do I need to reapply or maintain the jointing sand?
It depends on a few things, like how much you use your patio and the weather. Generally, you might need to top up or replace the jointing sand every 2 to 3 years, especially in areas with a lot of foot traffic. It’s a good idea to check your joints each year for any signs of wear or missing sand.
When should I consider calling a professional for my interlock paver issues?
If you’ve tried fixing the weeds and sand yourself but the problem keeps coming back, or if your pavers are starting to shift or sink, it’s probably time to call a pro. They have the right tools and experience to properly install or repair the base and joints, ensuring a long-lasting solution.
How do Ottawa’s winters affect interlock joint sand?
City’s freeze-thaw cycles are particularly hard on joint sand. Water seeps into joints, freezes, expands, and pushes the sand out over winter. By spring, many homeowners find their joints are partially empty — which is exactly when weeds take hold. Annual inspection and topping up after thaw is strongly recommended.